Add Row
Add Element
UPDATE
Add Element
  • Home
  • Categories
    • Outdoor Living
  • Local Business Spotlights
  • Menu
  • Chiropractic & Physical Wellness
  • Dental & Preventative Care
  • Events & Happenings
August 12.2025
3 Minutes Read

Driveway Crack Repair: A Simple Guide for Homeowners on a Budget

Visible driveway crack surrounded by purple flowers and planter.

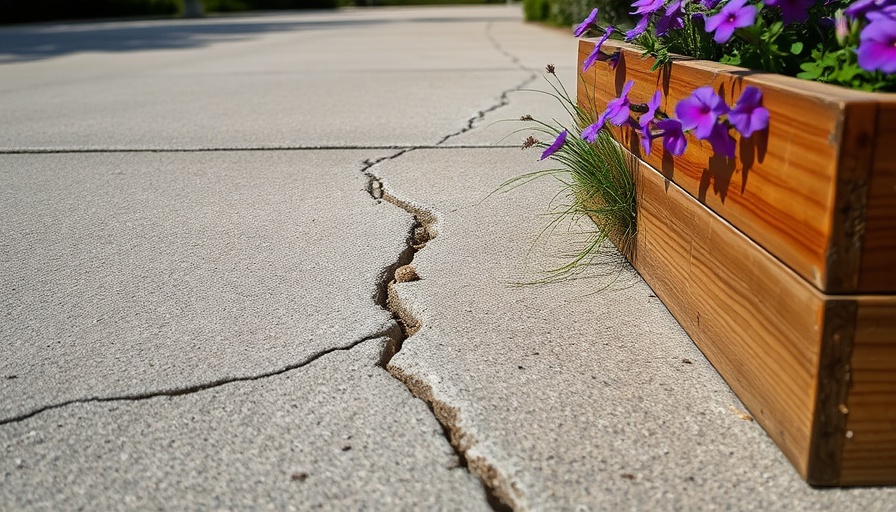
Understanding Driveway Cracks: A Deep Dive

Driveway cracks are more than just an aesthetic nuisance; they can signify deeper issues within your concrete foundation. Various factors contribute to the deterioration of driveways, including weather conditions, improper installation, and even tree roots pushing beneath the surface. Understanding these causes is essential for homeowners in the MidSouth, where seasonal changes can exacerbate such damage.

The Importance of Timely Repairs

Letting cracks go unrepaired can lead to more significant problems down the line. Water can seep into the cracks, leading to freezing and thawing cycles that further expand the damage. Additionally, a neglected driveway can significantly reduce your property’s value. By addressing these cracks proactively, not only can you maintain curb appeal, but you'll also avoid more extensive repairs that could be costly and time-consuming.

Your DIY Guide: Fixing Driveway Cracks

Follow these six easy steps to effectively repair your driveway cracks, keeping your property looking its best:

1. Choose Your Filler Wisely: Self-leveling fillers are ideal for narrow, irregular-shaped cracks, while non-sag fillers work best in deeper, wider cracks. Remember, understanding your filler types ensures a more durable repair.

2. Prepare the Area: Clear out any debris using a shop vac or leaf blower. A clean surface is crucial as it promotes better adhesion of the filler.

3. Fill the Cracks: Apply your chosen concrete crack filler, ensuring it fills the space adequately. Consider using a backer rod for deeper voids. This supplies a solid foundation for your filler and prevents it from sinking.

4. Smooth the Surface: Use a trowel or your finger to smooth the filler out and make it flush with the surrounding concrete. This will give your driveway a more finished look.

5. Monitor the Weather: Timely application is vital; ensure temperatures remain steady for 24 hours post-application to allow for proper curing. Rain can wash away the filler before it sets.

6. Maintain Your Driveway: Once the repairs are complete, consider sealing your driveway every few years. A sealant can prevent water and debris from penetrating your concrete, extending its life.

Emotional Impact: Why Your Home Matters

For many homeowners, a driveway is more than just a place to park—it is the welcome mat to your home and your sanctuary. A well-maintained driveway reflects an individual's commitment to their living space and overall well-being.

Environmental Considerations in Repairing Concrete

Choosing eco-friendly materials for your driveway repair can minimize your environmental impact. Look for products that utilize sustainable resources or are free from harmful chemicals.

Future Trends in Driveway Maintenance

As concerns about sustainability grow, more homeowners are looking toward green products and methods for home maintenance. In the future, we expect to see innovations in eco-friendly sealers and fillers that offer not just durability but also minimize environmental impact.

Conclusion: Take Action Today!

Driveway maintenance is an essential part of homeownership that promotes the value and safety of your property. By investing just a few hours and moderate costs now, you can prevent larger issues from creeping up later. So collect your tools, select your materials, and take the plunge—your driveway (and home) will thank you!

Home Maintenance & How-To’s

1 Views

0 Comments

Write A Comment

*
*
Related Posts All Posts
08.14.2025

Urgent Recall: Thousands of School Buses Risking Fire Hazards This Fall

Update Fire Risks Prompt Recall of Thousands of School Buses As the new school year approaches, it’s that time again when parents gather school supplies and children anxiously prepare for the first day of classes. However, this year, thousands of families in the MidSouth may need to reassess their morning routines due to an alarming recall affecting nearly 17,000 school buses. What’s Wrong with the Buses? The recall stems from serious concerns identified by the National Highway Traffic Safety Administration (NHTSA). The issue lies with a defect in the brake pressure switch assembly that can lead to a dangerous situation on the road. In these buses, brake fluid can leak into electrical components, potentially leading to a short circuit. According to NHTSA, such malfunctions increase the risk of fires, which can occur while the bus is parked or even when it’s in motion. Which Buses Are Affected? This recall focuses on specific models manufactured by International Motors, LLC. The affected buses include: 2016, 2017, 2018, 2019, 2020, 2021, 2022, and 2023 IC Bus CESB models Even buses previously repaired under an earlier recall (number 23V398) are not exempt, as those repairs have proven insufficient. The importance of this recall cannot be overstated—parked outside and far away from other structures until repairs are made is a crucial precaution during this period. What Should Parents Do? If your school district utilizes any of these affected buses, it’s vital to consider alternative transportation for your children to ensure their safety. The NHTSA is due to send notification letters to owners in late September 2025, detailing the necessary repairs, which will include installing a silicone black jumper harness at no cost to bus owners. Parents eager to ensure their children’s safety while commuting should call International customer service at 1-800-448-7825 for more details regarding the recall and to identify if their school bus is impacted. The NHTSA has also designated the recall number 25V503000 for easier tracking. Understanding Brake Issues The importance of brake systems in vehicles, particularly for school buses that transport many children daily, cannot be underestimated. Regular maintenance and immediate attention to recalls can save lives. It is heartening to see that safety is being prioritized with these recalls, reminding us always to remain vigilant about vehicle safety. Future Insights: Ensuring Safer School Transportation This recall is a wake-up call not only for parents but also for manufacturers and school districts to reevaluate the safety protocols in place for school transportation. As technological advancements continue to enhance vehicle safety, it’s crucial for manufacturers to stay ahead of potential issues that might compromise the safety of young passengers. Public transport safety not only falls on the manufacturers but also on schools and communities collectively ensuring that all safety checks are in place. This recall underscores the need for ongoing communication between manufacturers, school districts, and families. Staying Informed In times like these, staying informed is your best line of defense. If you are a parent in the MidSouth, consider joining local parent forums or school communications to discuss transport options as the school year begins. Reach out to your district if you have concerns, and don’t hesitate to ask for updates regarding bus safety. Your proactive involvement is essential. Conclusion: Safety First As parents gear up for the school hustle once again, ensuring the safety of their children during transport should be at the forefront of their priorities. Awareness regarding recalls and potential risks associated with school transportation can lead to better decision-making for families and foster a safer environment for our kids. Remember, communication is key! Don't hesitate to reach out to your school district for guidance during this time. Making sure that our children travel to and from school safely is perhaps one of the most important responsibilities we hold as guardians. Stay safe and informed!

08.12.2025

Are Frozen Detergent Laundry Pods a Smart Hack or a Waste?

Update Is the Frozen Laundry Pod Hack Worth It? The latest trend in DIY laundry solutions has homeowners in the MidSouth buzzing: making your own frozen laundry detergent pods. Proponents claim this clever hack serves as a cost-effective and environmentally friendly alternative to buying expensive, single-use pods. But does it actually deliver the cleaning power your clothes need, or is it just a messy experiment? A Closer Look at the Process To create your very own frozen pods, you simply fill a silicone ice cube tray with your favorite liquid laundry detergent and place it in the freezer. Some enthusiasts enhance their pods by adding scent booster beads, fabric softeners, or even baking soda, shaping them for convenience. Once frozen, these little blocks of detergent are easy to pop out, store, and use when it’s time to tackle that pile of laundry. Sounds easy, right? Does Freezing Detergent Actually Work? Ultimately, the answer is not as straightforward as it might seem. Yes, you can freeze detergent and use it to clean your clothes, but the effectiveness of this method is highly questionable. Bill Carroll, a chemistry expert, underscores that freezing can compromise the cleaning efficacy of the detergent. When subjected to extreme low temperatures, the enzymes—natural agents that target stains—risk becoming inactive. As he points out, if freezing were truly beneficial, major detergent brands would likely offer this option themselves. Potential Risks & Drawbacks Additionally, liquid detergents are formulated to work optimally at room temperature. Freezing could alter the chemical structure of the detergent, leading to unpredictable results. Even highly concentrated formulas can transform into a gooey mess, failing to deliver the performance expected. With modern products designed for convenience and efficiency, the frozen pod method could hinder rather than help your laundry process. Environmentally-Friendly Alternatives Fear not, aspiring DIY-ers! If you're drawn to sustainable practices, there are better ways to reduce waste while also keeping your home clean. Instead of freezing detergent, consider making your own dry ingredient laundry pods. When you use ingredients like washing soda, borax, and grated Castile soap, these ingredients remain stable and effective. Simply mix and spritz with a little water until they clump together, then store them safely. Embracing Laundry Sheets For those prioritizing convenience, laundry sheets offer an innovative alternative to traditional detergents. Available in various scents and formulations, these sheets are lightweight, compostable, and easy to use. Just toss one in with your clothes, and let it work its magic without the mess of liquid or powdered detergents. With reduced plastic waste and space-saving capabilities, laundry sheets are transforming the way we approach clean clothes. Community Connections in Sustainable Practices As homeowners in the MidSouth navigate these trends, it’s essential to connect with local resources that promote healthy living. Whether accessing community workshops or local cooperatives focused on sustainable home practices, there are endless opportunities to share ideas and support one another in the pursuit of enhancing our living spaces. Final Thoughts: Weighing Your Options Before jumping onto the frozen laundry pod bandwagon, it’s crucial to assess whether this clever hack serves you well or will leave you with dirty clothes and wasted time. With better alternatives available, your laundry routine can become more efficient and environmentally friendly without the risk of diminished cleaning capabilities. Embrace creativity in your home cleaning routine, and find approaches that bring out the best in both your garments and your commitment to sustainability! Are you ready to explore the world of efficient laundry cleaning while adopting sustainable practices? Dive into innovative solutions today and transform the way you do laundry!

08.11.2025

Master Ladder Safety on Stairs: Essential Tips for Homeowners

Update Why Ladder Safety on Stairs Matters Using a ladder on stairs can be daunting, and with good reason. Statistically, both ladder and stairway-related accidents are common sources of injury. According to data from OSHA, many fall-related injuries occur due to improper use of ladders, especially on staircases where the terrain isn’t level and conditions can be less than ideal. Every homeowner has likely seen someone precariously trying to balance on a ladder in a stairwell, gripping tightly but clearly at risk. This article sheds light on how to do it safely, as well as alternative options to mitigate danger. Understanding the Risks The dangers of using a ladder on stairs can vary based on several factors. Firstly, poor lighting amplifies the risk, making it easier to misstep. A dimly lit staircase might hinder your depth perception, making it hard to gauge where to place your feet. Secondly, clutter on the stairs increases falling hazards, regardless of your ladder skills. Lastly, carrying heavy loads can seriously hinder your ability to maintain three points of contact, which is essential for safety. The Importance of Using the Right Equipment Not all ladders are built for the challenges of stair use. Using makeshift solutions like blocks of wood to level a standard ladder on stairs is dangerous. Instead, both professionals and experienced DIYers recommend investing in specialized equipment. Two popular options are the PIVIT ladder tool and the Ladder-Aide. Both of these tools assist in leveling your ladder safely and effectively, allowing you to work confidently. Safe Climbing Techniques and Practices When it comes to using a ladder on stairs, adopting safe techniques can significantly reduce the risk of accidents. Ideally, ensure that the ladder is placed sturdily and check for any damage before climbing. As you ascend, always maintain three points of contact—two hands and one foot, or two feet and one hand. This critical practice ensures that if you slip, your fall may be mitigated. Seeking Professional Help If the task seems overwhelming, consider hiring a professional. As noted by licensed handyman Francisco Fuenmayor, he often employs ladder techniques absorbed from years of experience in various challenging situations. When the risk doesn’t seem worth it, a professional can safely handle higher-stakes tasks that involve ladder work on stairs. Alternative Options for Home Improvement Sometimes the best solution to your home improvement challenges lies in avoiding ladders altogether. Devices like scaffold units or hiring a local handyman for those tricky spots can eliminate the need for precarious ladder usage on stairs. Many times, an investment now could save both time and potential injury in the long run. The Path Forward for Safety Your home should be a place where you feel safe and secure. By implementing proper ladder safety techniques and investing in appropriate tools, you can turn any home improvement project into a worry-free experience. If you care about creating a beautiful space, consider reviewing your ladder protocols and equipment to enhance not just your creativity, but your safety. If you’re planning that next big home project that requires ladder work on stairs, take a moment to assess your safety measures. By following expert advice and using the right tools, you can make your home improvements without the worry of a dangerous fall.

Terms of Service

Privacy Policy

Core Modal Title

Sorry, no results found

You Might Find These Articles Interesting

T
Please Check Your Email
We Will Be Following Up Shortly
*
*
*